Keyshot 6 Best Scene Automotive Download
30 KeyShot rendering tips
Rendering an image, blitheness of a model or even a whole scene is an important pace in art creation. Without this important stage, the end result volition wait unfinished. Whether it is for a portfolio or commercial purposes, beingness able to render your piece of work is a valuable skill.
Every artist has a favourite render engine to work with. KeyShot offers a wide range of tools and uncomplicated rendering solutions, enabling the user to have a beautiful and seamless creative experience. The easier the workflow, the better and quicker the results. Knowing your way around the software allows you lot to concentrate on the creative side of the procedure.
It may seem like in that location is a lot to larn when using this particular software, but that is not the case at all. Here are some tips to help guide yous through rendering your 3D art projects, from images to blithe music videos. Be enlightened that some of these steps are exclusive and based on the newest version of the software, KeyShot viii Pro, and are not bachelor in KeyShot vii or older.
Pushed for time? Nosotros've compiled the best free 3D models to aid get you started.
Download the files for this tutorial.
- How to render realistic transparent surfaces
01. Try KeyShot cloud
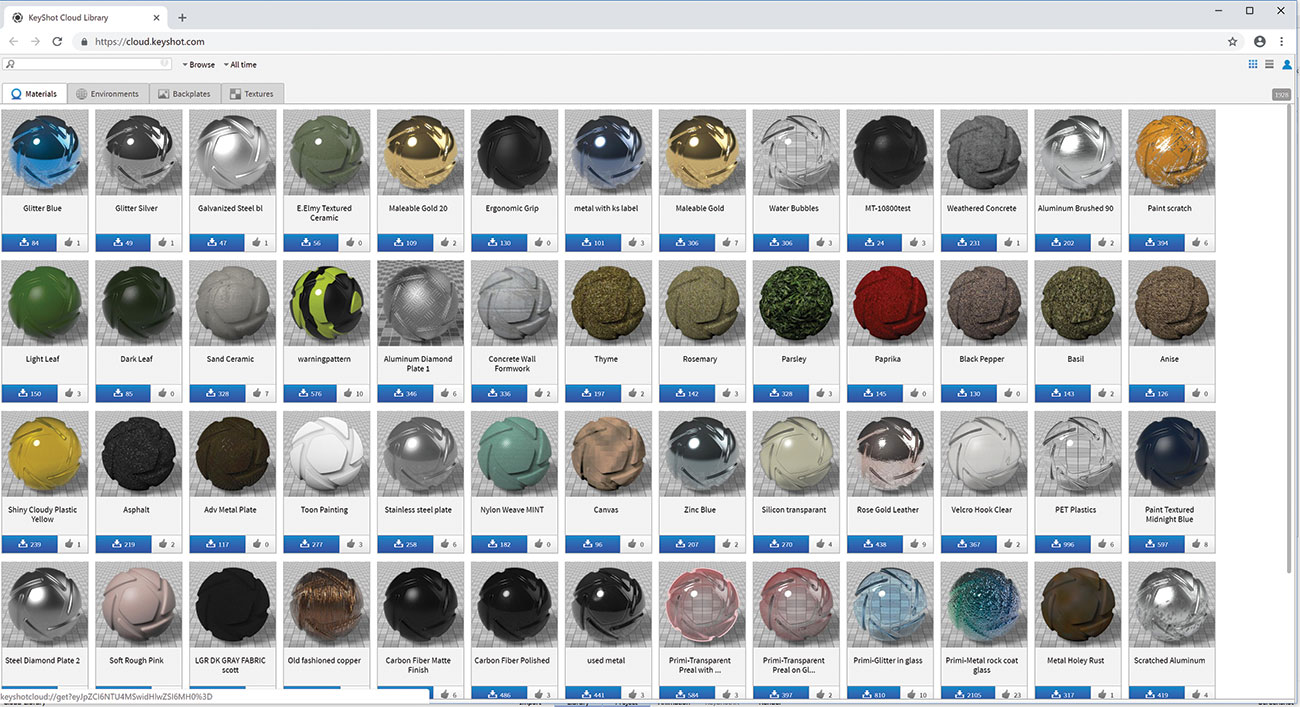
This is an online library of complimentary textures, materials, environments and backplates – there is a great multifariousness of resource to cull from. Yous tin also upload your ain materials to share with other KeyShot users. Great community endeavour.
02. Choose a UI theme

A quick procedure that can greatly assist with your learning is setting upwardly your ain interface layout. Putting relevant menus and tabs in strategic places tin speed up your workflow and learning process. When you know where to find the things you need, you will feel more familiar with the software. KeyShot offers two color themes: light and dark. To change the theme at any time get to Edit > Preferences > Interface, or select information technology from the Workspaces Startup ribbon dropdown.
03. Apply Performance Mode
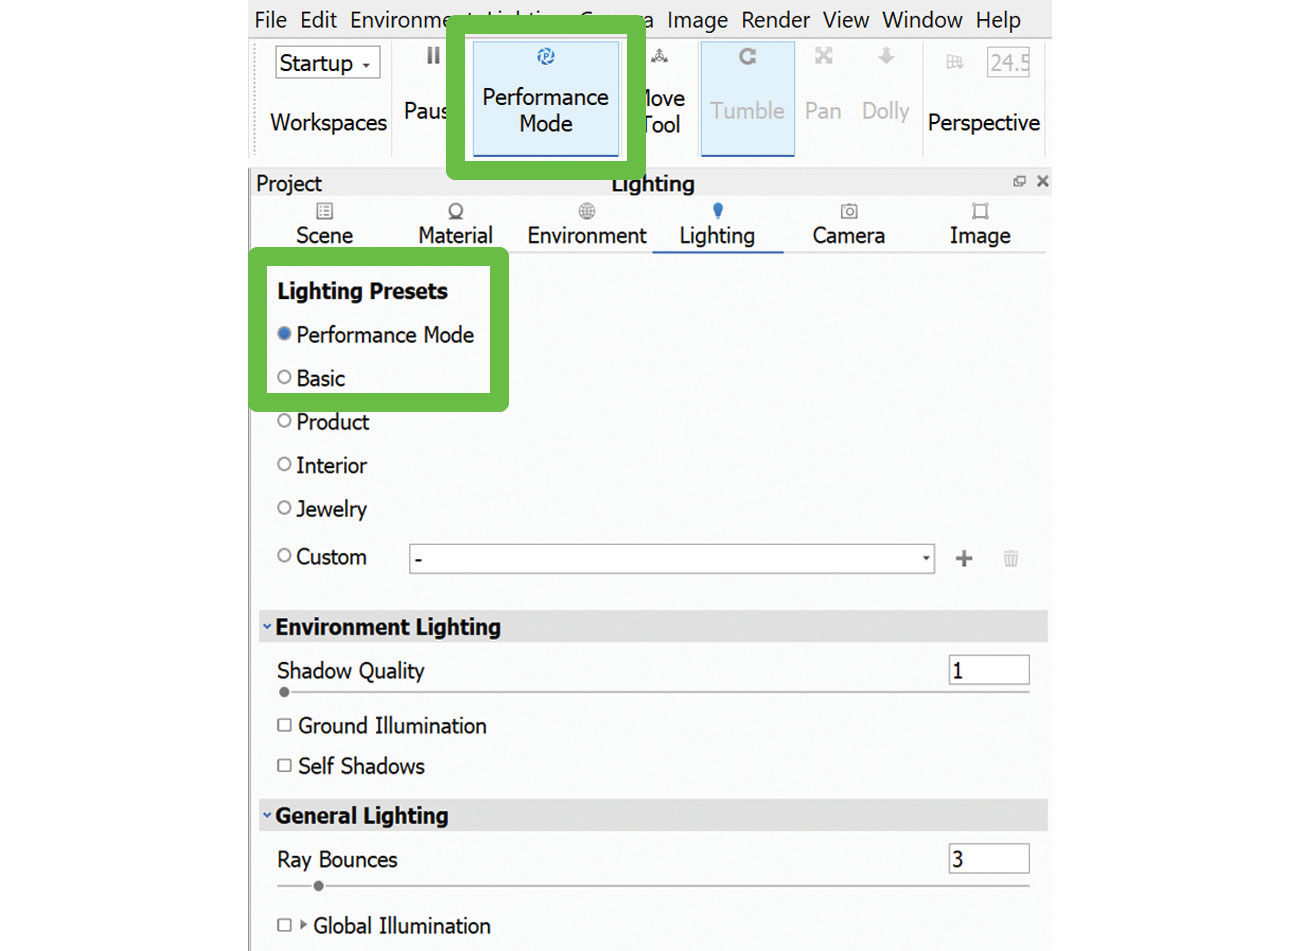
Once you've added a lot of lights to your project and the scene becomes 'heavy', navigation performance will driblet. Moving effectually the scene becomes difficult and laggy. The all-time solution is to actuate Performance Mode. It will remove sure light settings (global illumination, footing shadows) from the agile return and reduce the CPU usage pressure. You tin can also notice information technology in Projection > Lighting > Lighting Presets.
04. Link materials
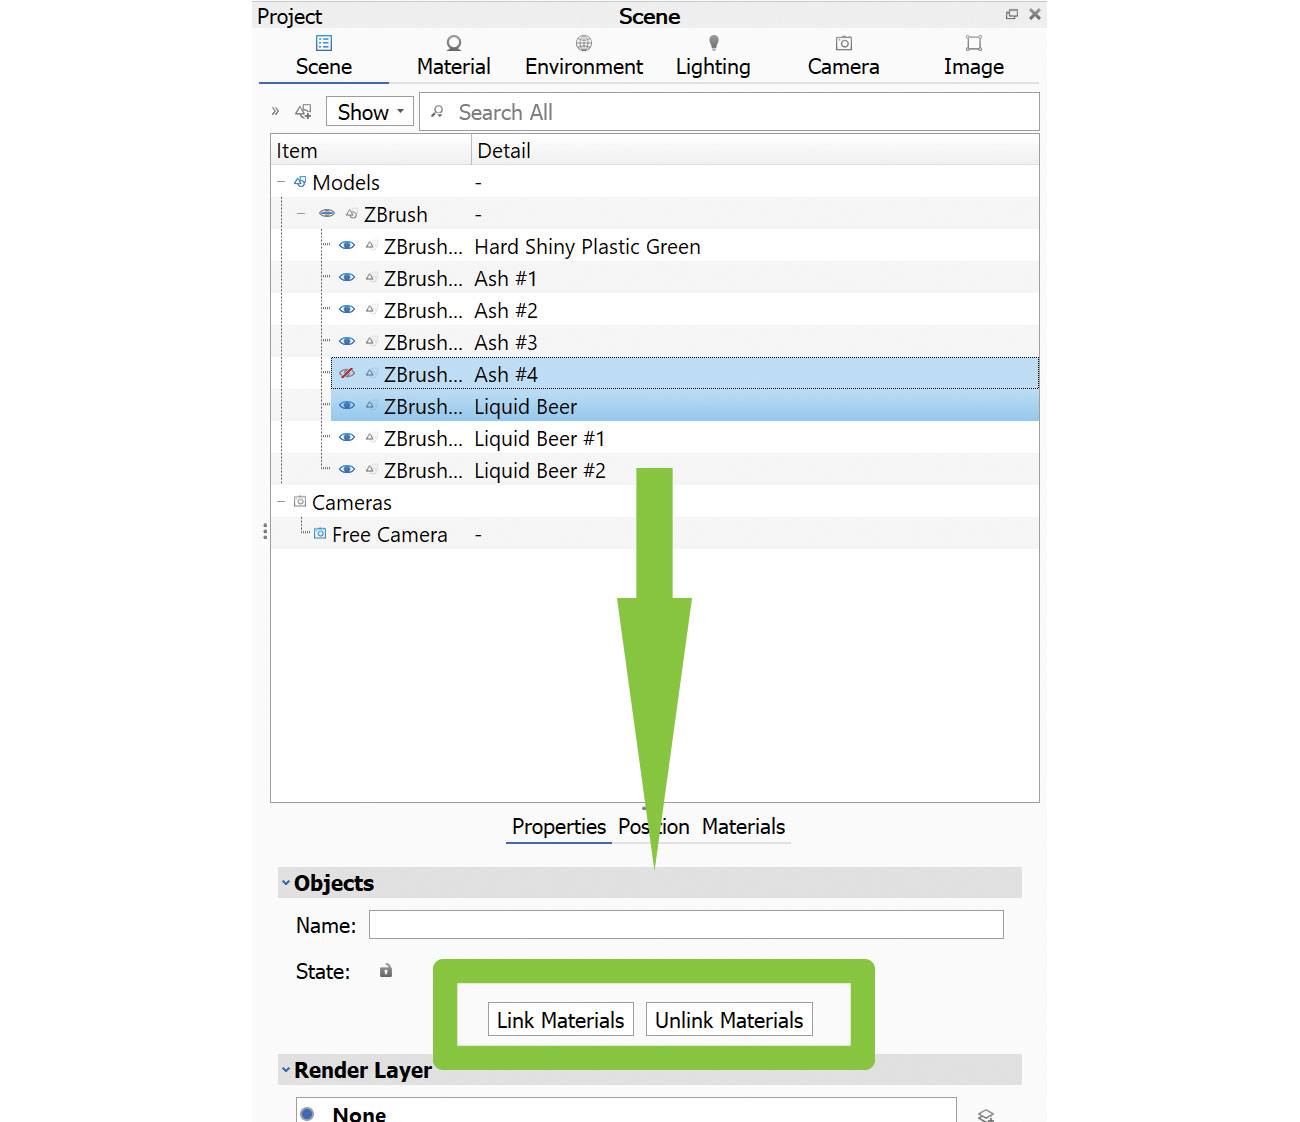
If yous have a material you want to utilize to multiple objects, there are a few things that can be washed. First, you tin can save out the cloth to your library, and then utilize it to the selection of objects. Pick two is to material link the objects and so all receive the updated changes. To exercise this, select 2 or more items and printing Link Materials. Alternatively, correct-click on the selected objects and from the pop-upwardly carte select Material > Link Materials.
05. Apply materials to labels
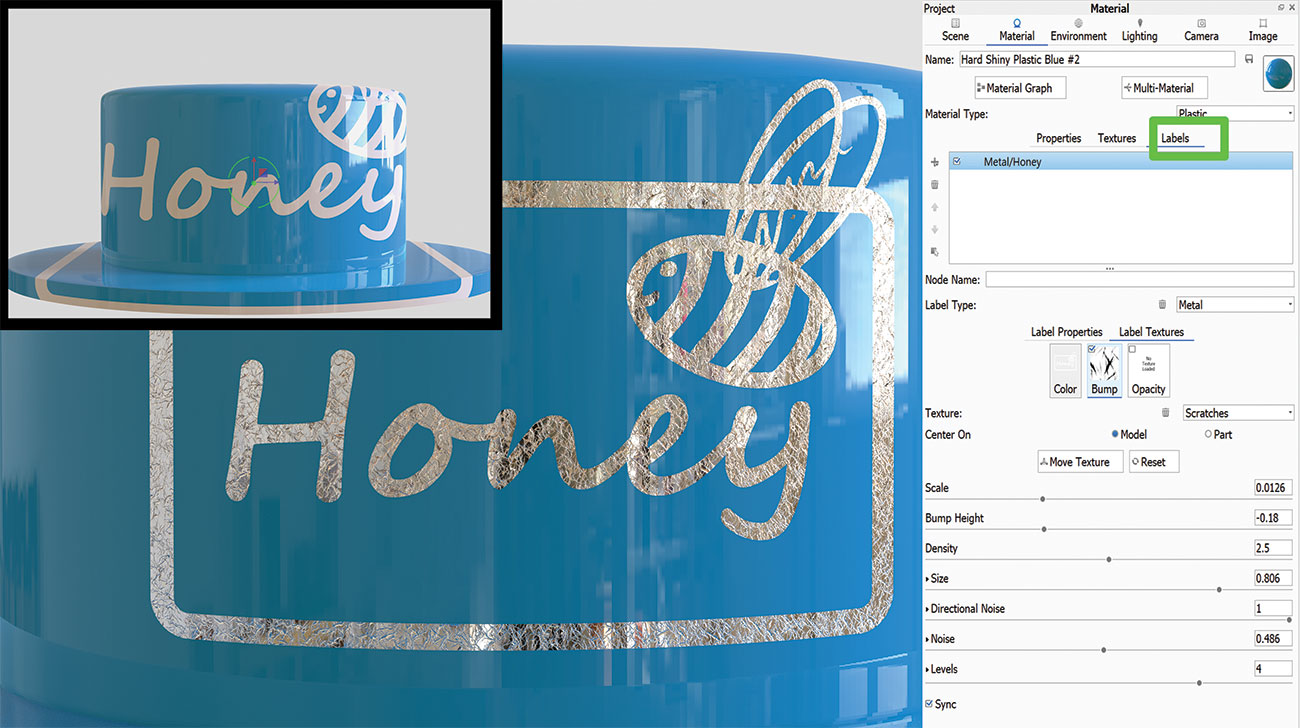
Labels practise not demand to be plastic and boring. Once applied to a model, labels can take on any cloth, crash-land or opacity desired. Information technology is literally as unproblematic every bit drag and drop. To add a piddling clothing and tear to a characterization, only find the right texture map and drop information technology in the Crash-land slot of the Labels tab. Select a procedural map from the drib-downwardly carte, for case, noise. If you want to apply the same texture as the parent object'due south, select the From Parent option. Alternatively, navigate to the parent Texture tab, select the Bump tile and tick Apply Bump To Labels located below. It volition projection the same map on all labels applied.
06. Create depth of field
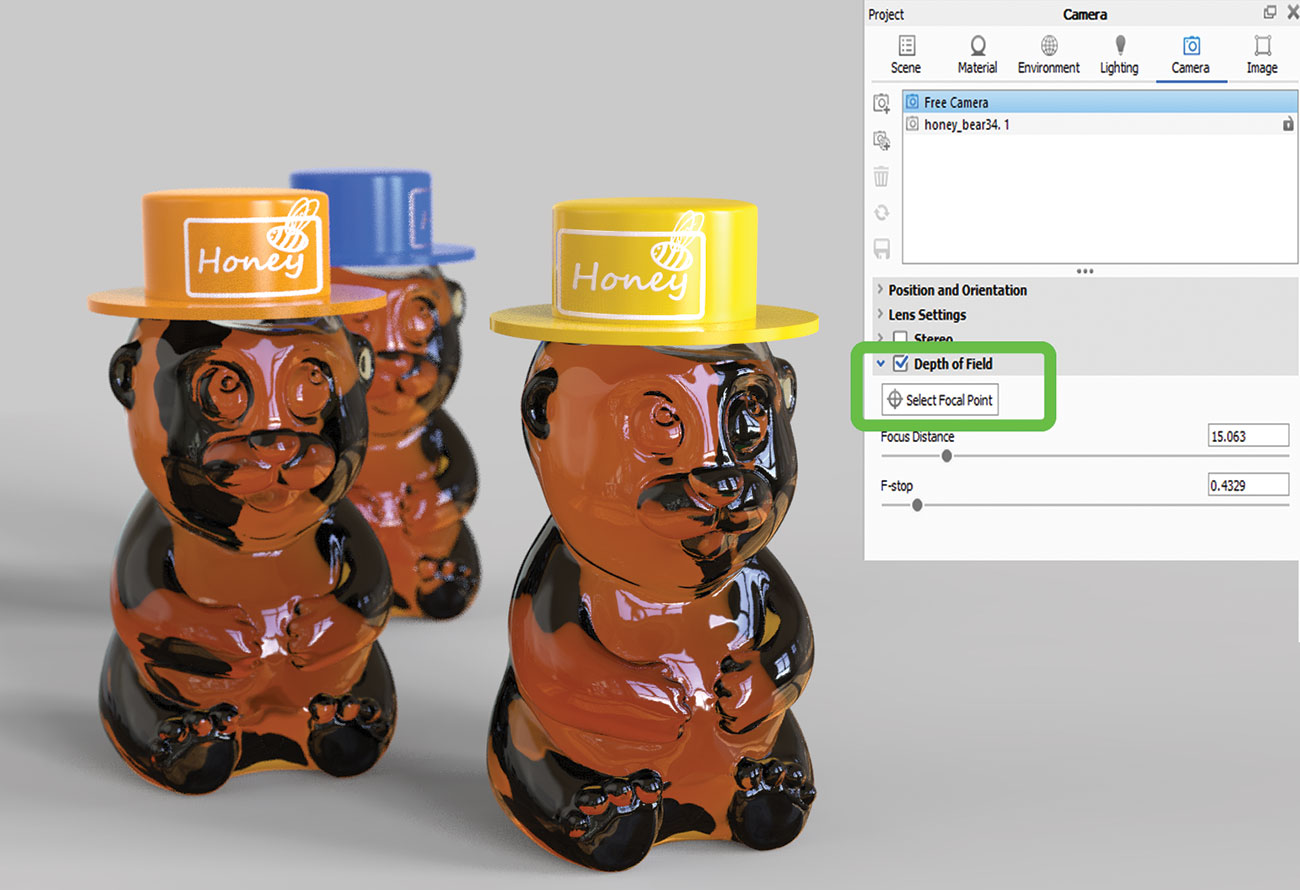
Tired of adding depth of field in post-product, faking information technology in Photoshop? Try calculation information technology to your agile window and run into the results before hitting the Render push. Depth of Field sits comfortably in the Camera tab, where it can be easily activated and manipulated with just a few sliders. Y'all can as well set the camera focus past clicking on the part of the model you want to bulldoze attention to. KeyShot will utilise the fix corporeality of blur based on your called focus and distance.
07. Region rendering

This is especially useful when working on a big project, in Operation way – there's no demand to return the unabridged thing only to run across how a lilliputian piece will look rendered. Open the Render carte and choose the region you desire to render. This will relieve you some serious time, and prevent your machine from overheating in the process.
08. Render gloss pass
KeyShot does decent return passes based on the materials and lights used in the scene, merely sometimes it is not enough and information technology would be useful to have additional renders of just clean specular and gloss. The all-time solution is to change the surround to plain black, and apply glossy black textile to the model. In the fabric editor adjust reflections and roughness (gloss), so use a pivot light to capture the right await.
09. Emboss logo
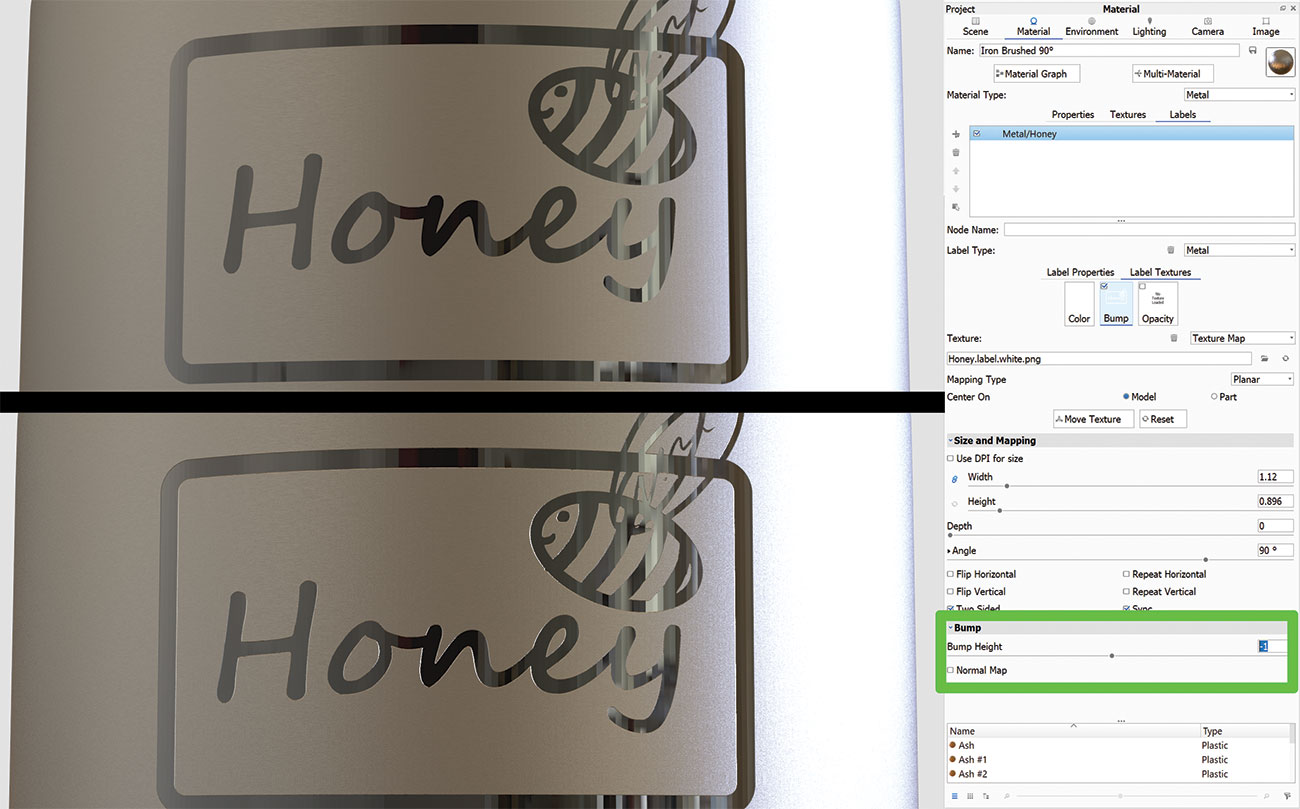
Import your logo to a characterization and apply it to the model. Set the scale and position using the sliders. Hold Alt and drag and drop your diffuse textile on the Bump slot to copy information technology. Whorl down to Label Texture > Bump and set it to, for example, -i.
10. Multi-materials
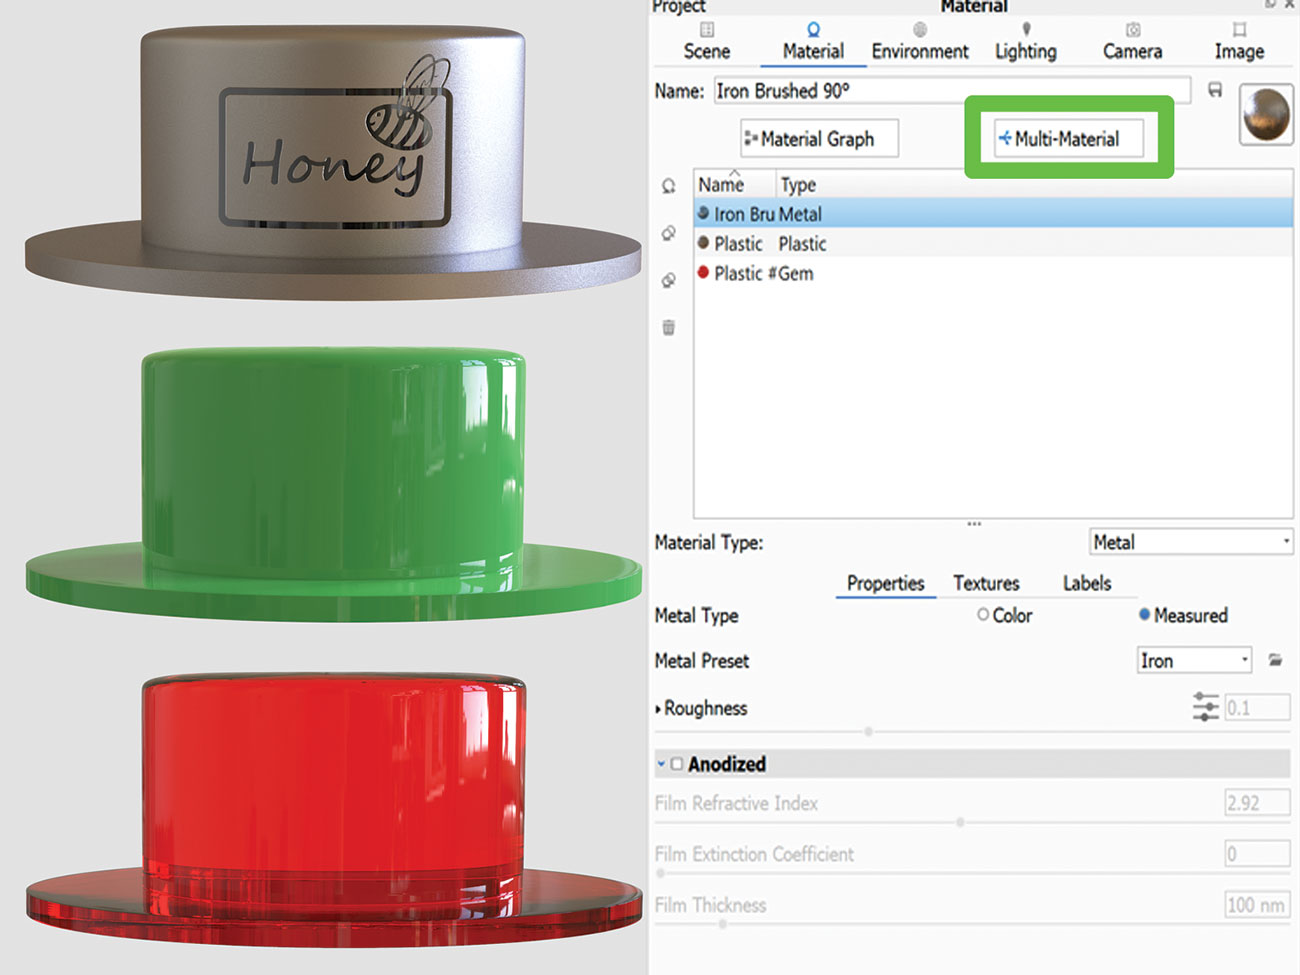
In this section you are able to create a new fabric, duplicate it, tweak it and link textures. Information technology is useful when creating variations of cloth or color, because it allows quick cycling through them all. You can locate information technology in the Projection > Cloth tab.
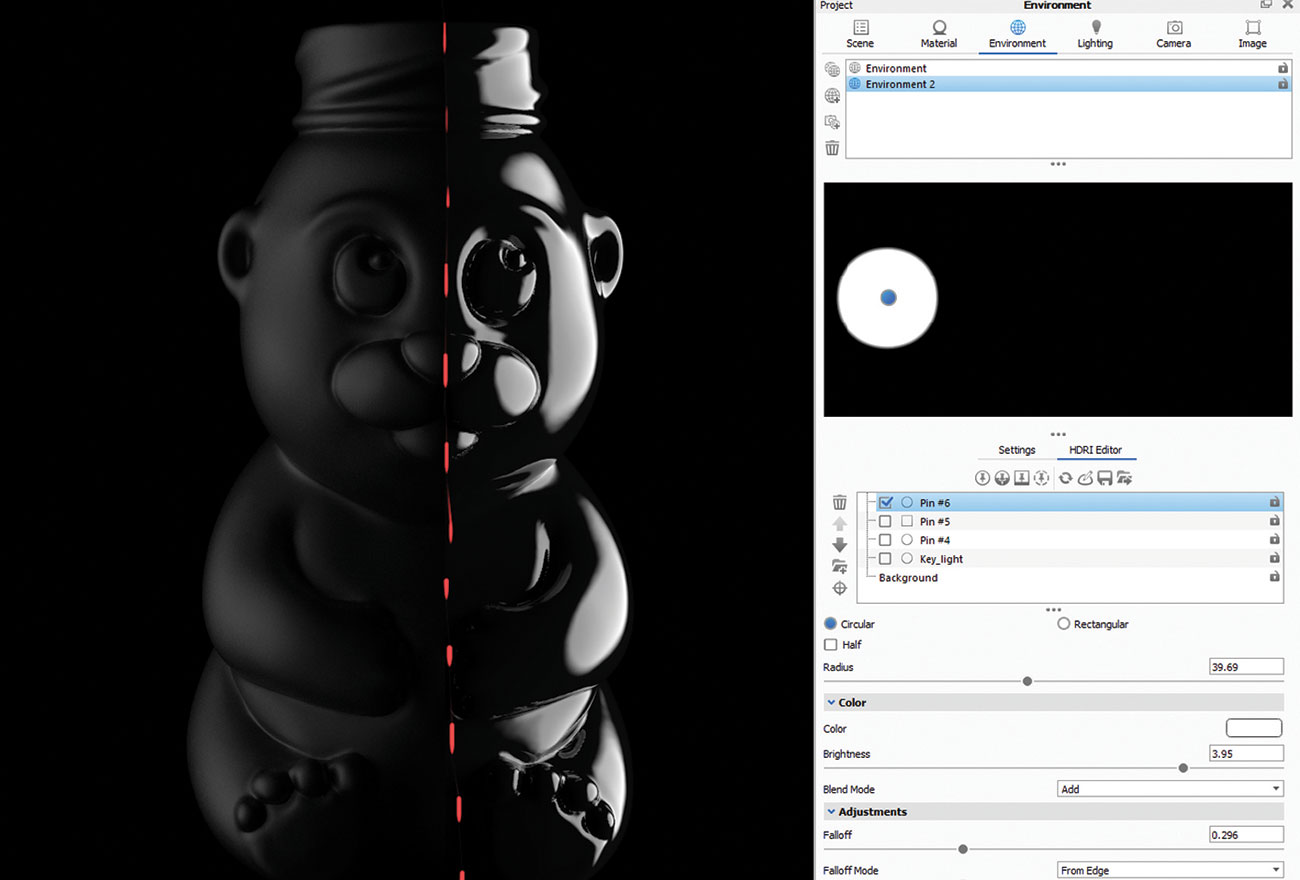
xi. HDRI three-signal light
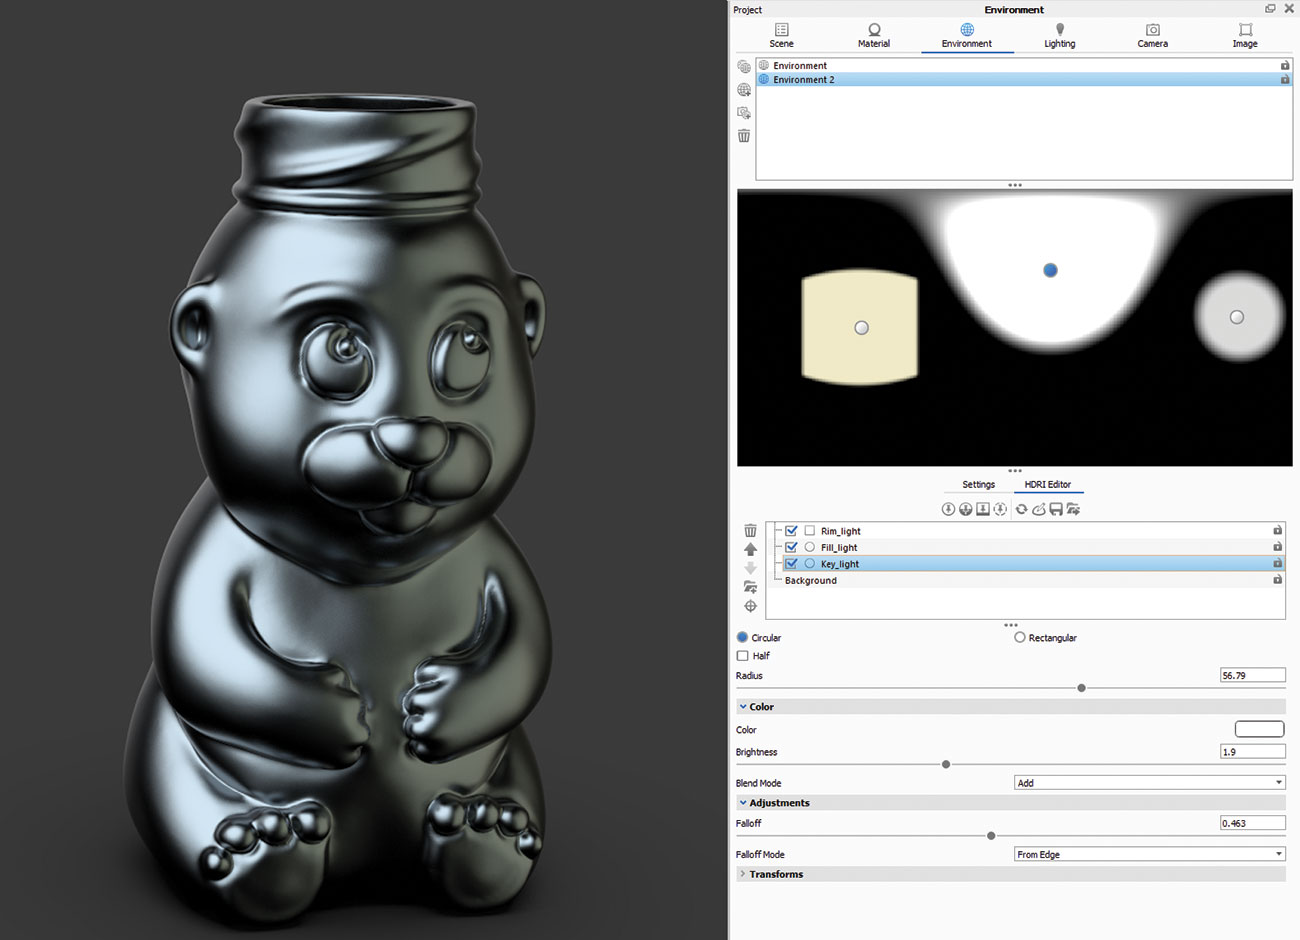
Artists are usually very familiar with the three-point calorie-free term. It focuses on three sources of light, which are generally enough to beautifully light the scene. These are: key lite, fill up lite and rim light. You tin simply fake that consequence with pins in the HDRI editor.
12. Edit your images
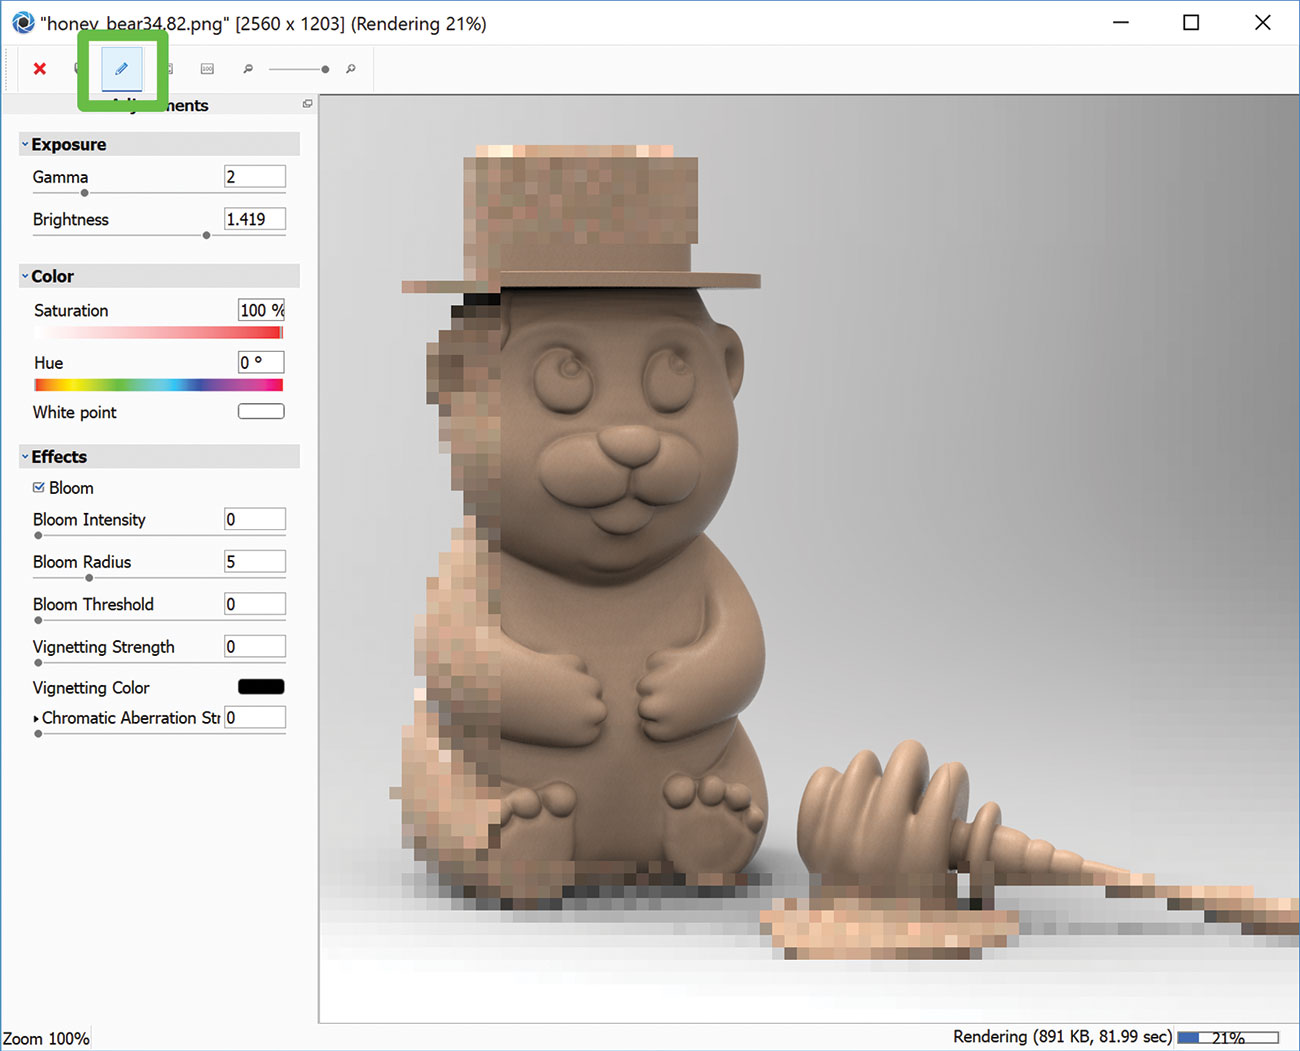
KeyShot is not but a render engine – it likewise offers some basic post-product editing tools. While your epitome is rendering, click the pencil icon in the active render window. The Show Effects console enables you to tweak elements like exposure and colour, or add effects like flower and vignette. When merely these nuts are required, there is no need to involve another application.
13. Utilize paradigm pins
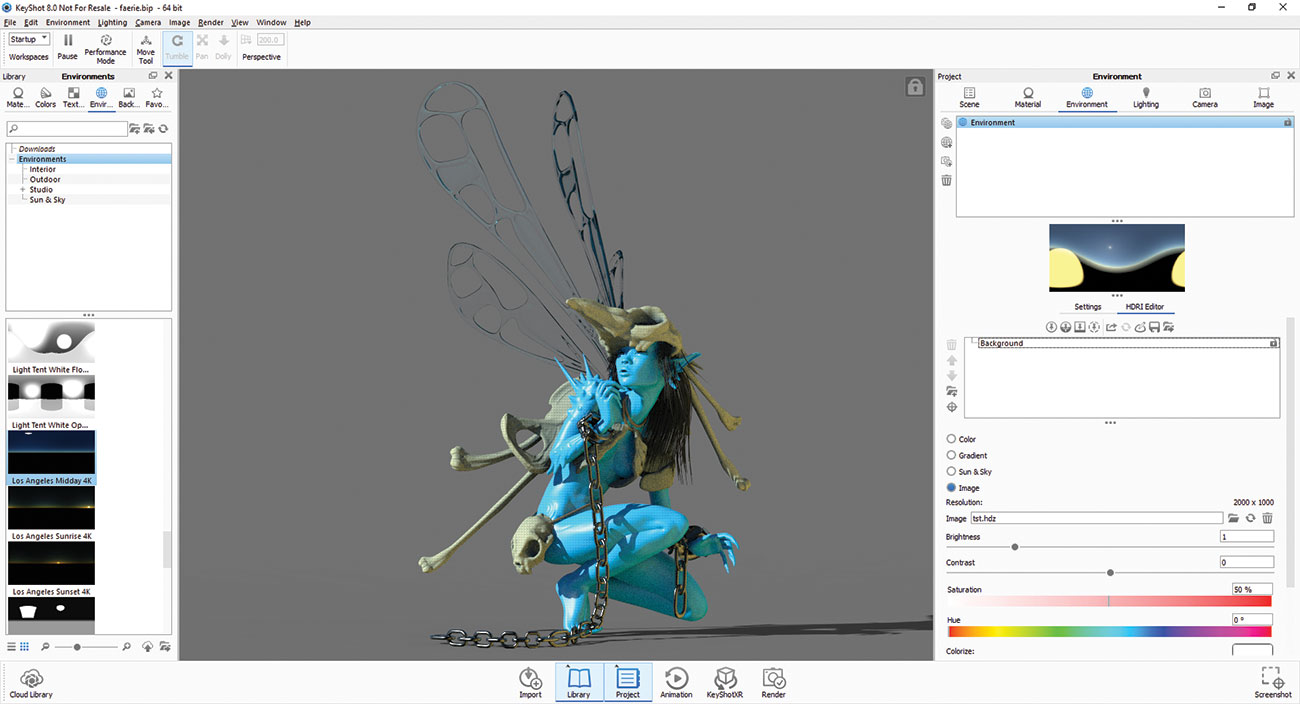
You lot can use image pins on top of your HDRI environment to successfully blend your model with the scene. Load the image you want to use as a light source and position information technology by moving the pin in the HDRI editor, or click on the model to point the projection at the right place.
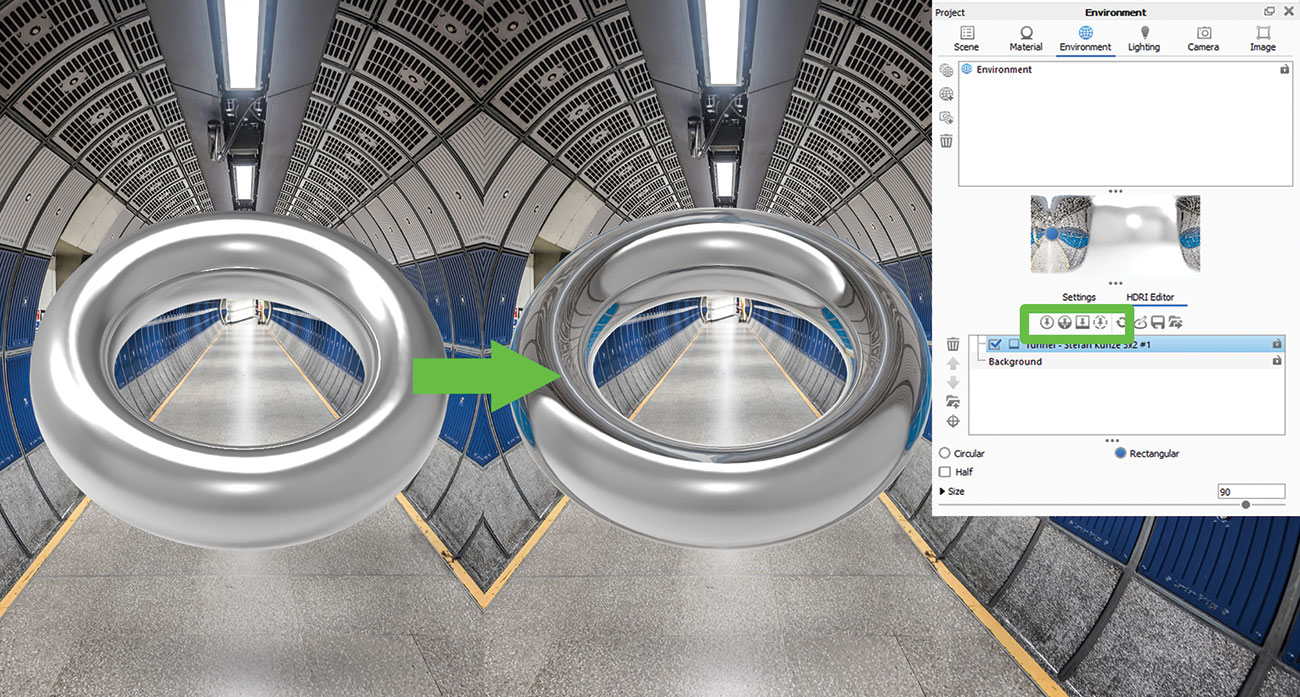
xiv. Block HDRI hotspots
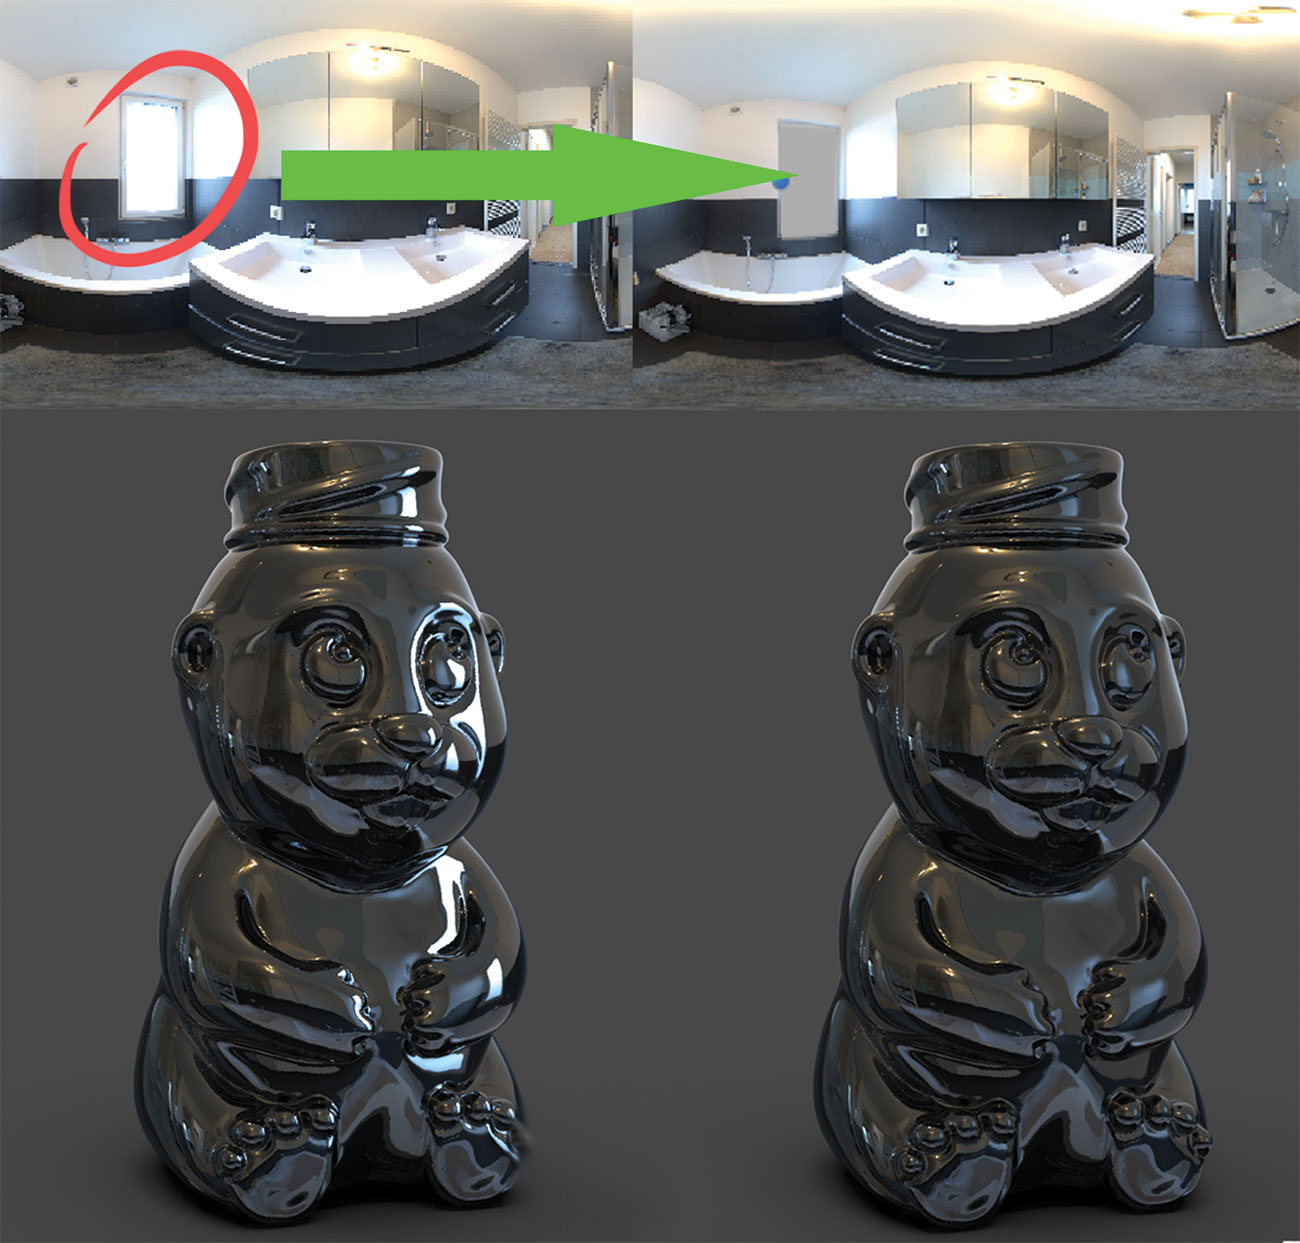
What if yous've got that perfect HDRI but there is a nasty hotspot ruining the paradigm? You can block information technology hands, just create a pin calorie-free, suit the size and shape, modify color to gray (or whatever colour to blend with the HDRI), modify type to blastoff and identify it on meridian of the hotspot.
15. Preview the map
If you lot are working in the material editor applying layers of changes and calculation lots of maps to the mix, you may finish up struggling to run into the deviation it makes to the final look. A bigger problem may appear if you lot need to edit a single map and you lot cannot see much through all the layers. Simply click on the texture and press C to preview the map and KeyShot will isolate it on the model for easier editing.
16. Work in Geometry View

Sometimes information technology is easier to work in the Geometry View when setting up the scene. Hit (O) on the keyboard, or navigate to Window > Geometry View and a secondary viewer volition open up. Navigating in that manner is a lot quicker. Information technology allows a much smoother camera, concrete lights and model positioning, scene limerick besides as viewing all camera paths.
17. Accept screenshots

The quickest way to screen catch your active window is to press (P) on the keyboard, or alternatively, press the Screenshot button located in the bottom-correct corner. It will automatically salve the JPEG or PNG in the Rendering folder. The file format can exist changed in the Preferences > General > Screenshot tab.
xviii. Understand IOR
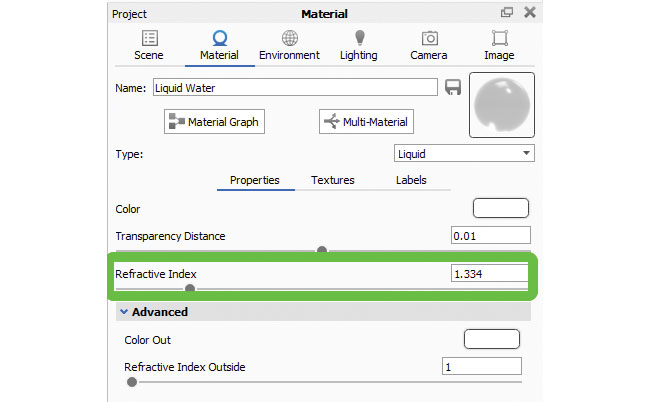
The Index of Refraction is very important in the re-creation of real materials. KeyShot materials already have right IOR, but if you create your own and want to avoid visible errors, find the accurate IOR value online and adjust information technology in the Project Material carte du jour.
19. Camera animation setup
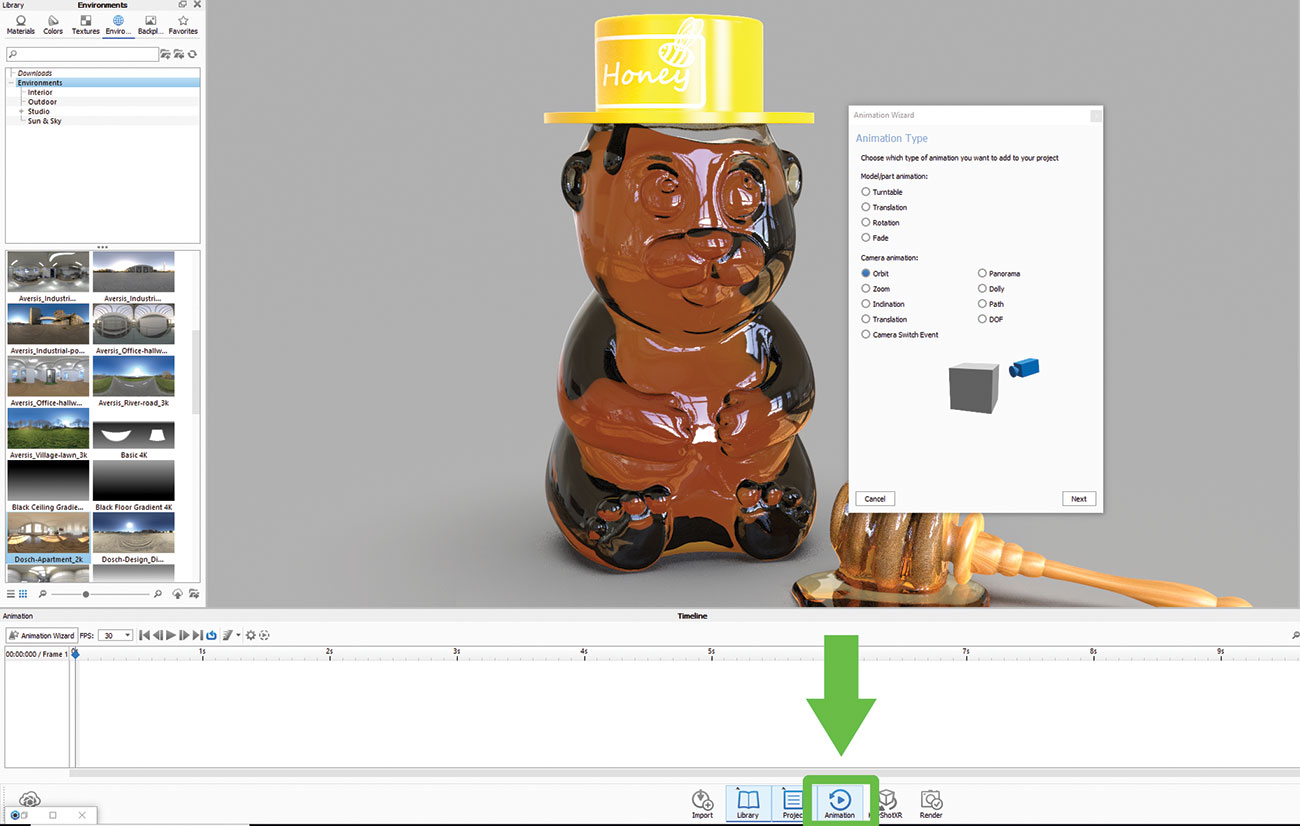
Whether yous want to animate the camera to zoom (dolly), tilt (pan), rotate (tumble) or orbit an object, KeyShot has a very simple step-by-step setup to help you along the way. You can also lock the camera'southward pivot to a model and create a turntable.

This is a useful tool for creating instances of models. Right-click on the model in the scene bureaucracy tree and choose Brand Pattern from the list. Unlike duplicates, instances are speed and file size constructive, just it does not hateful they are material linked.
21. Presentation fashion

Equally the proper name suggests, Presentation Mode (Shift+F) is made to showcase your WIP without the surrounding menus. Information technology is a more than elegant way to view your model in its current land. It allows you to view all Model Sets and Studios for easy comparison.
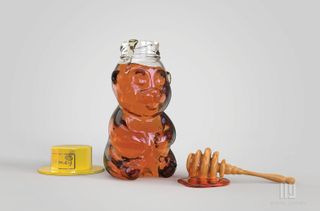
22. Liquid simplicity

Remember how you had to split your glass model into three parts to render a realistic glass of water? Not whatever more! One of the many incredible new features in KeyShot viii is that the software takes intendance of it for you lot. You merely need to make certain that the liquid model intersects the drinking glass to create a proper refraction upshot. There cannot exist any space left between the two parts, they must overlap.
23. Create bubbling
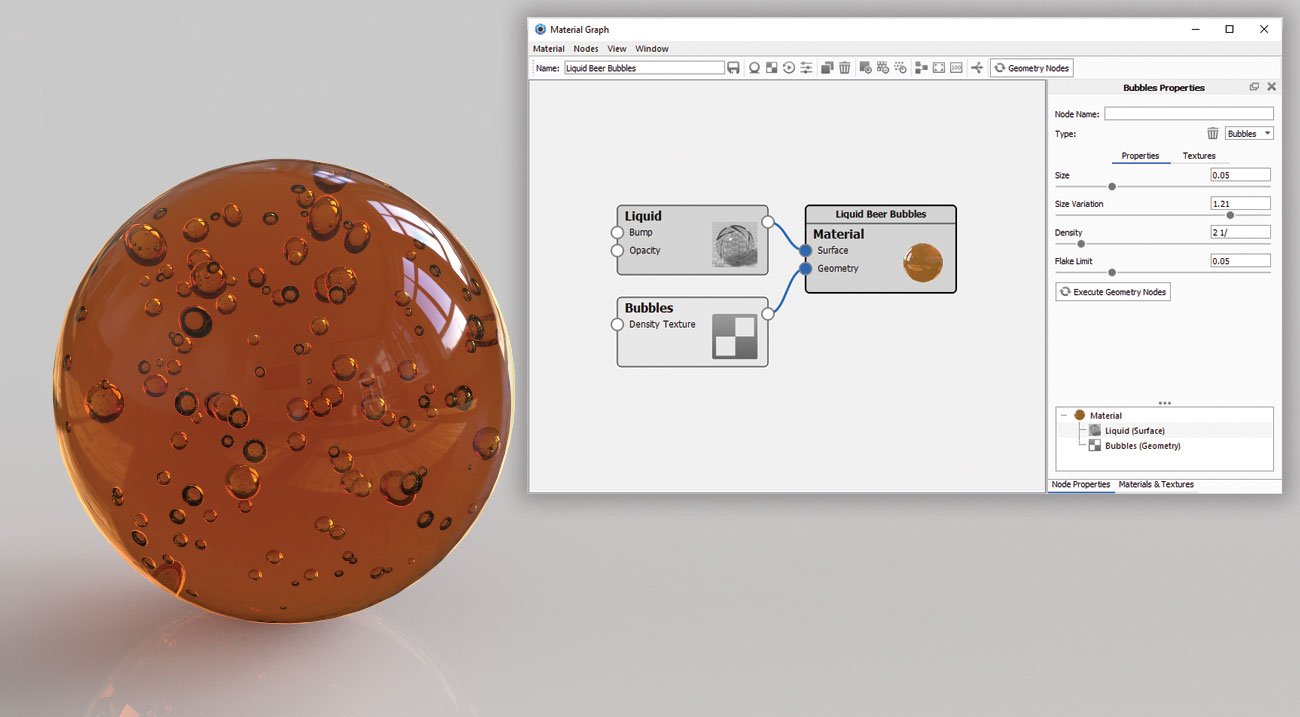
There is an easy way to add bubbles to your materials. Navigate to your textile, open up the Textile Graph, right-click to bring out the nodes list, and select Geometry > Bubbling. Double-click on the Bubbles node to open the editor on the right-mitt side of the Cloth Graph menu. The options let you edit the size, volume and scattering of bubbling.
24. Cutaway
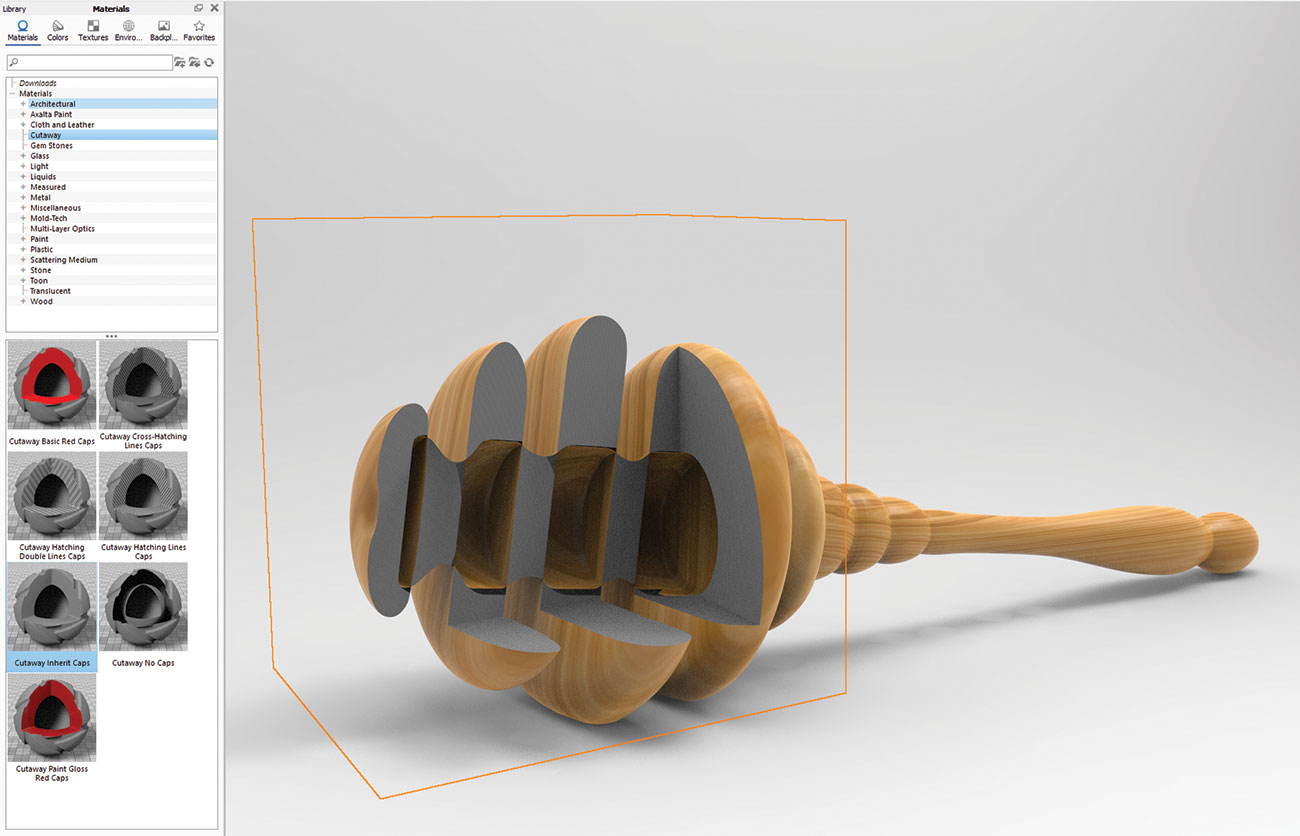
This new feature is a range of materials that will let yous to showcase what is hiding inside a multi-function model. Add a dummy geo to the scene, for example, a cube, and utilise one of the cutaway materials. Position the cube so it intersects the model. You lot can colour or exclude certain parts from beingness afflicted.
25. Handful medium
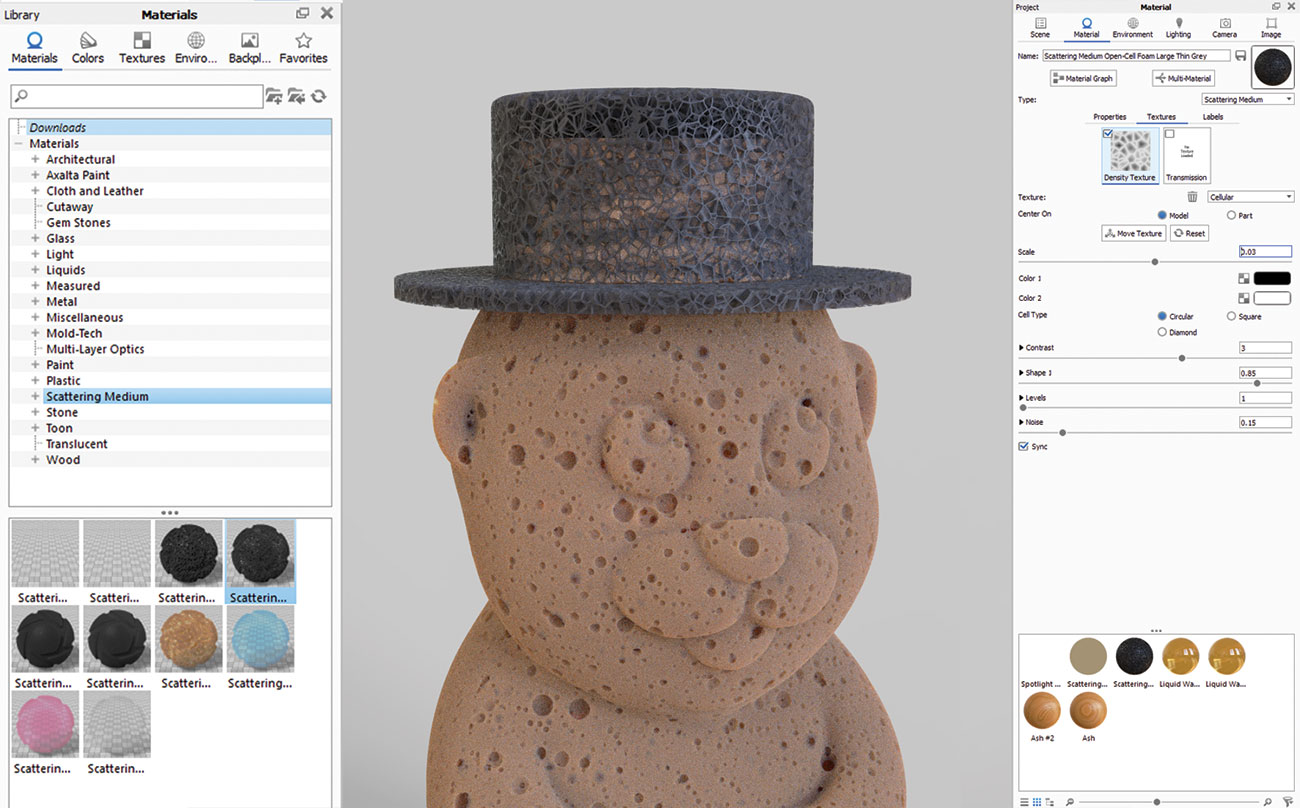
Another fantastic prepare of new materials that tin can exist used in lots of different means. With merely a few small tweaks of the options available, you tin create all sorts of spongy looks, fog, smoke, clouds and many more.
26. Render volumetrics
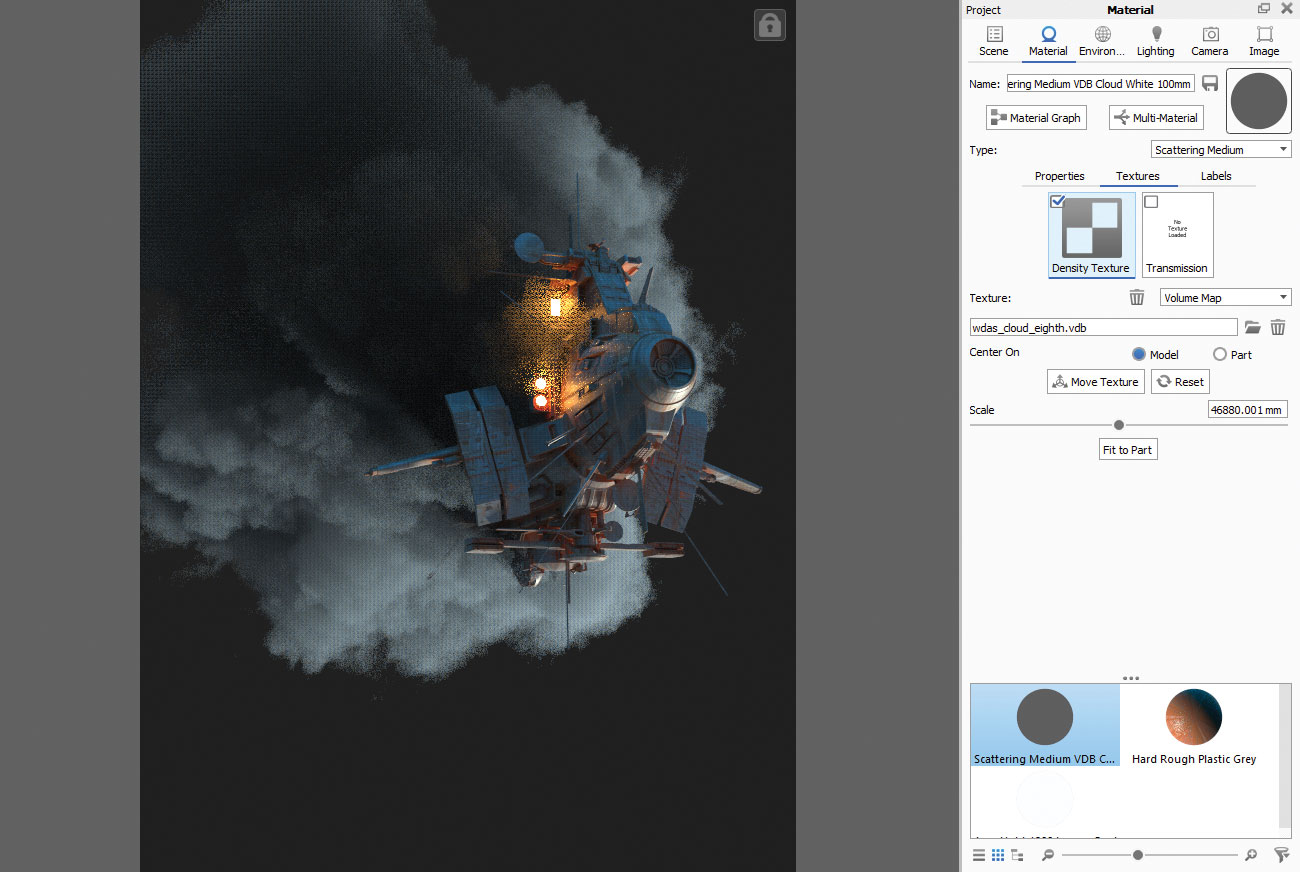
One of the newest (and coolest) features in KeyShot 8 is the ability to render volumetrics. Consider it every bit a volume box with all possible furnishings applied to it – clouds, fog, sponge-like materials. Look for free VDB files on the net to find new shapes of volumetric effects, from simple cigarette smoke effects and clouds, to heavy fume or nebula. Upload information technology in the Texture slot of your volumetric fabric, and from there y'all can accommodate its density and transparency. The final look will differ as you tweak the settings, and so yous really have to experiment in order to become the result you like. The volumetrics will also exist affected past shadows and lights too.
27. Gear up HDRI maps
KeyShot comes with a large set of HDRI images to help you highlight your scene in no time. But what I like about is to gear up up my ain HDRI map that volition fit my needs.
I usually try to keep things simple. I create a principal source light starting time, and and then a rim calorie-free (a calorie-free that comes from the sides to create a low-cal consequence on the side edges of the subject area). A skilful pull a fast one on is to put the secondary light opposite the main low-cal source: bottom if the primary light is tiptop, left if the main light is positioned on the right. Then I use the Settings parameters to fine-tune my orientation and intensity. KeyShot will always give you great lighting results.
28. Materials
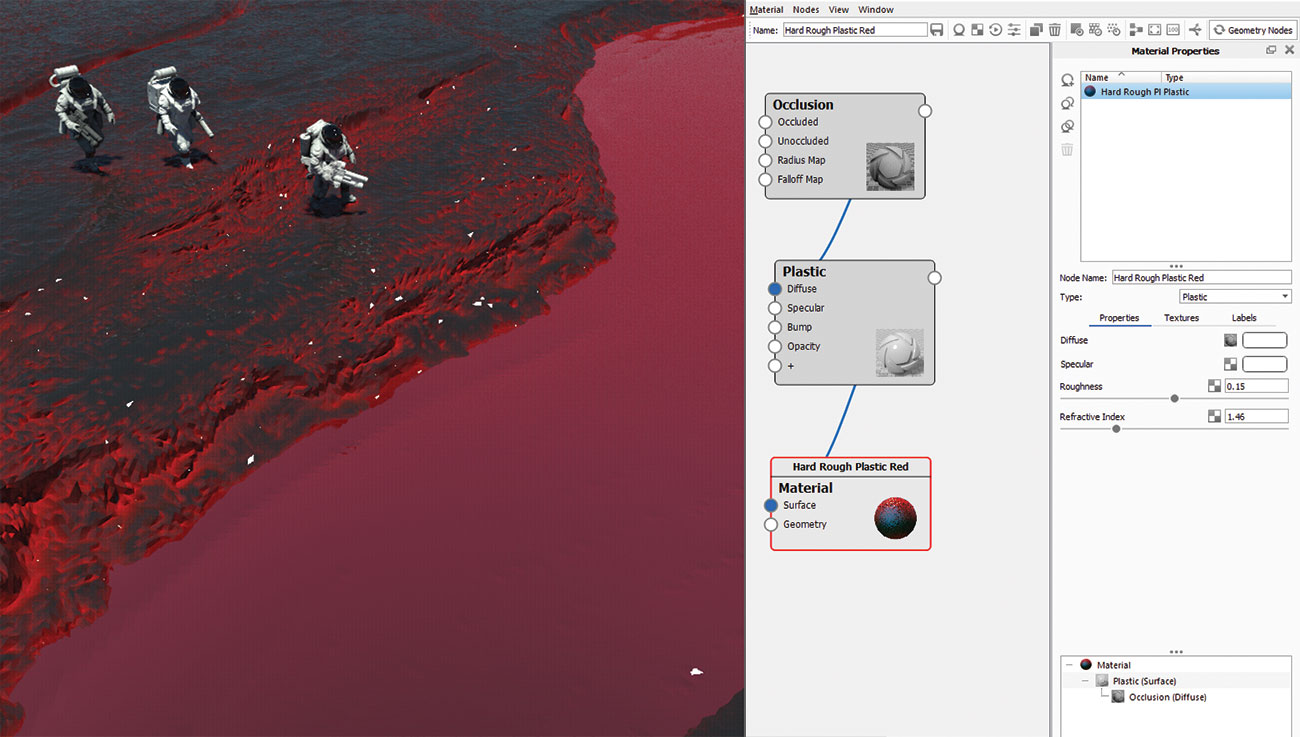
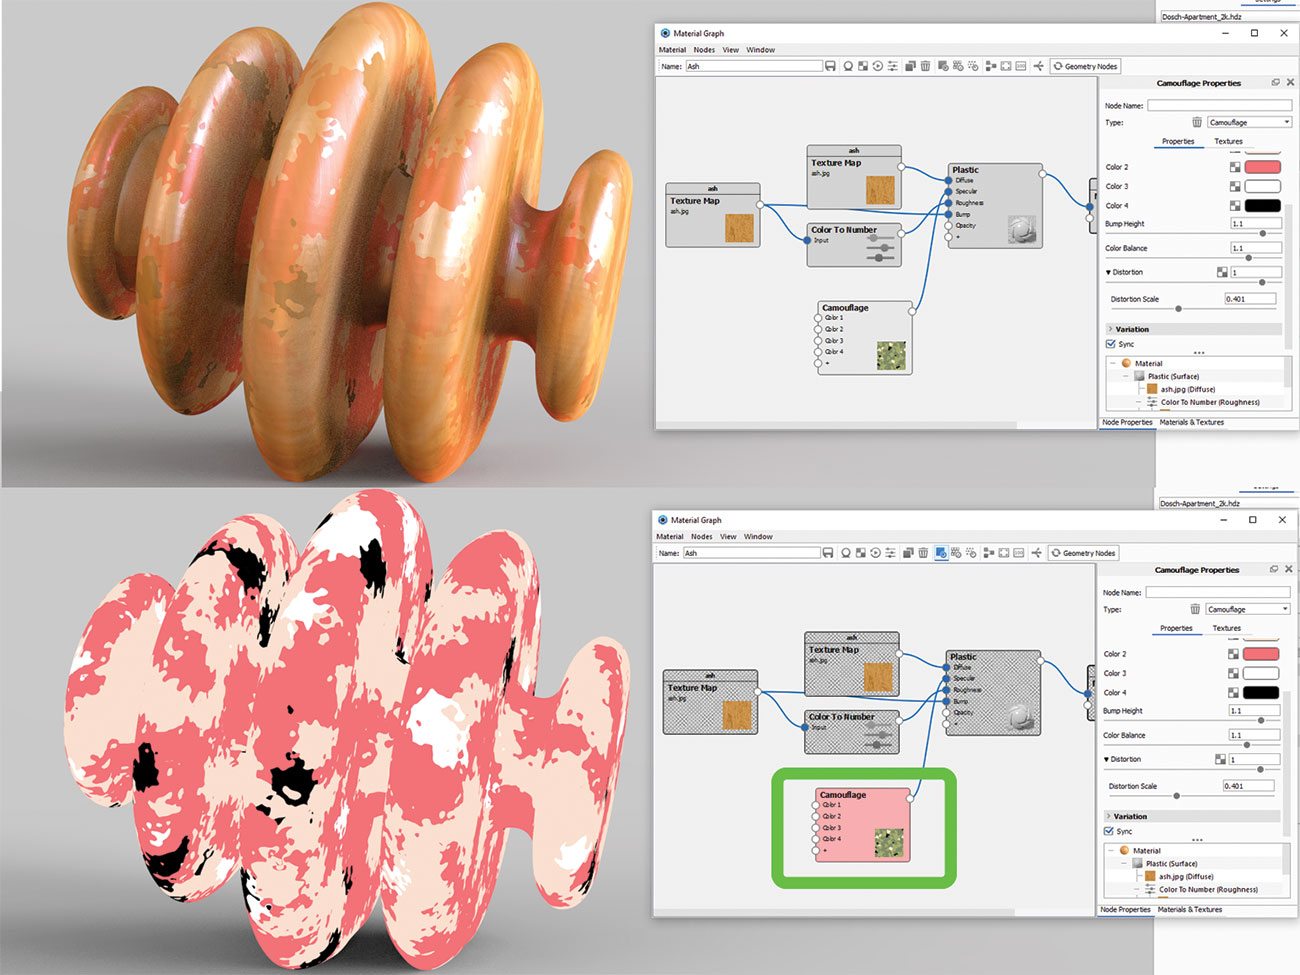
Another great asset in KeyShot is its preset material library, full of accurate shaders from classic plastics and metals to more complex offerings like car paints and pare shaders.
Simply if yous open the Fabric Graph editor, a whole new globe opens up to you. Editing in nodal mode takes a scrap of practise at first, but information technology gets easier very quickly. My usual set of materials ever relies heavily on the object's topography. I set up rules to paint i specific cloth at ane part of the object, like holes and crevices, and another type of textile on bigger surfaces. I like to blend my fabric together by using the Apoplexy or the Curvature texture equally a mask, sometimes both for more complex results.
29. Interior mode for rendering
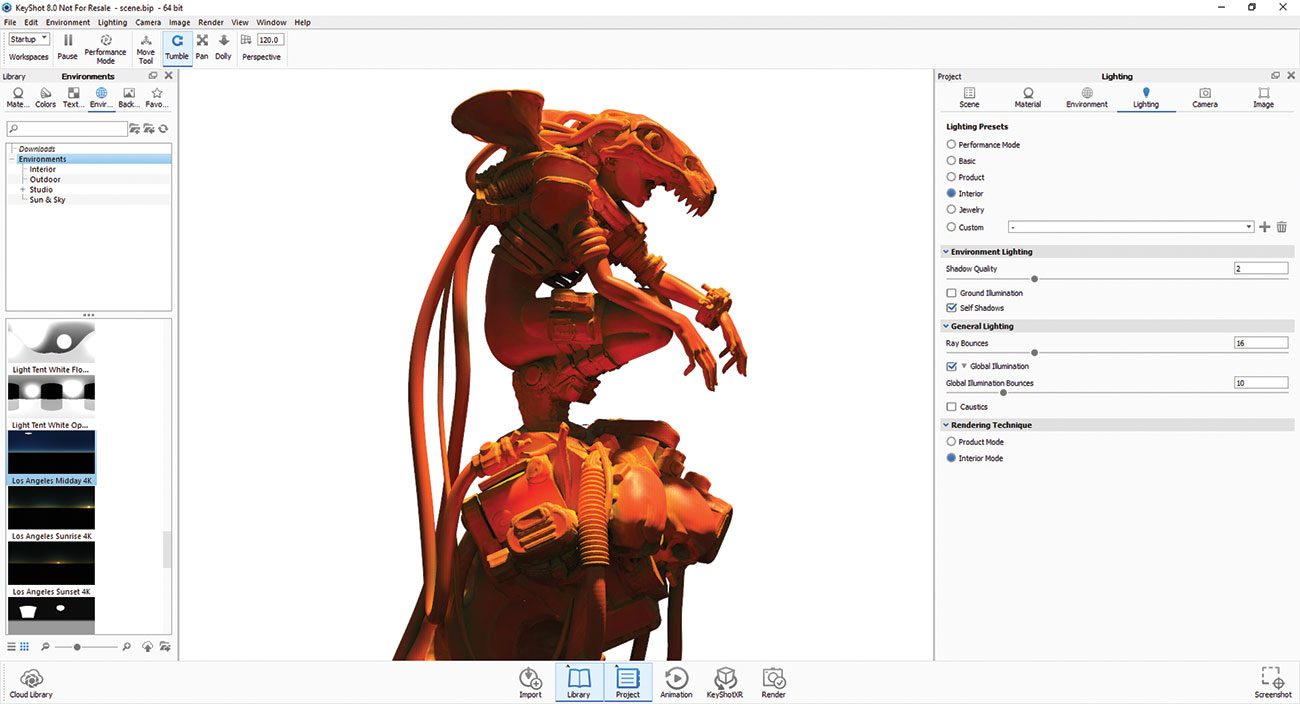
KeyShot is my favourite rendering tool. It is fast and accurate, can handle heavy scenes and it tin can render in very large resolution in no fourth dimension. It is a perfect companion for my personal illustration workflow.
Amidst the many rendering presets (y'all can notice these in the Lighting department) I usually prefer the Interior Mode. This mode creates smoothen shadows and seamless gradients, fifty-fifty at super high resolution, and I can get accurate and realistic renders. Annotation that the Interior Mode will crave yous to gear up a rendering time limit, which will vary depending on the complexity of your scenes.
xxx. Prepare up passes
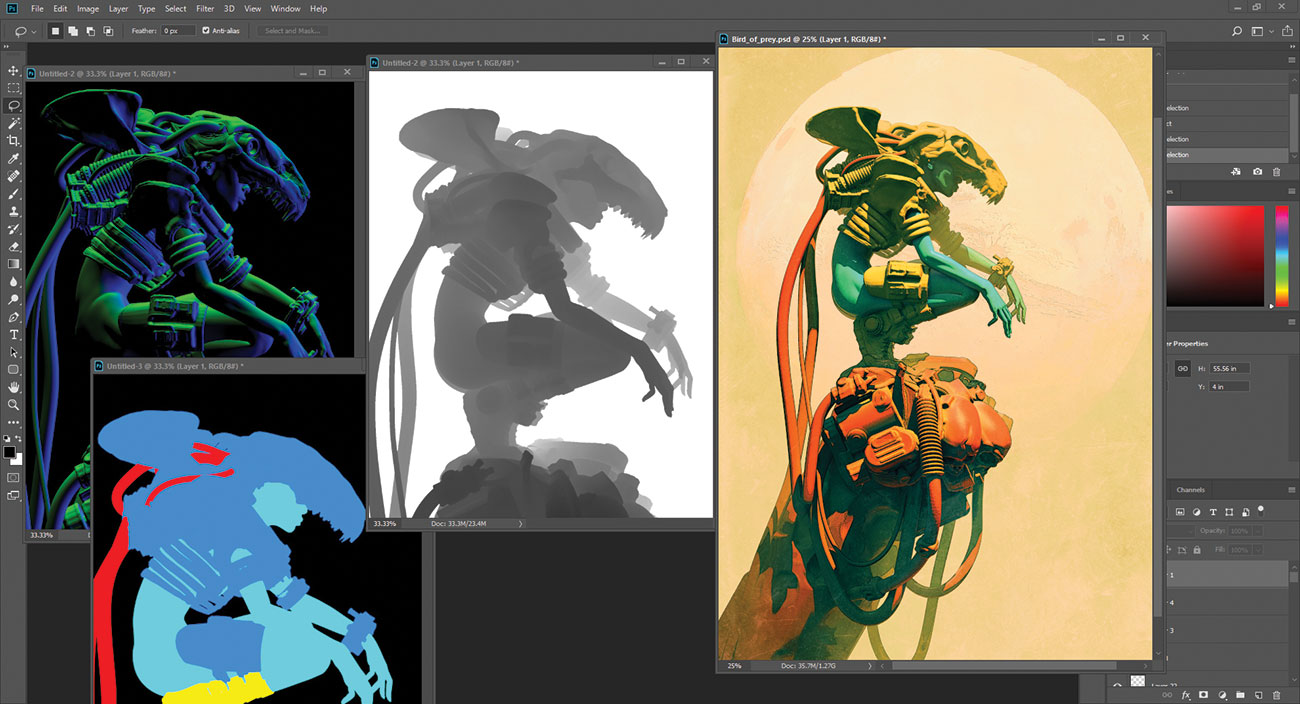
Another great rendering feature in KeyShot 8 is the ability to select the passes you want to take embedded in your PSD files. Y'all accept a vast option of options, similar pro renders for the cinema industry, from depth pass to clown pass, specular, normal maps and more than. I find all of these passes super handy for my postal service-processing work.
This article was originally published in issue 242 of 3D Globe , the world's best-selling mag for CG artists. Purchase event 242 here or subscribe to 3D World hither .
Related articles:
- The best cities for 3D artists
- OctaneRender: A beginner's guide
- 3D art: 27 stunning examples to inspire you
Related manufactures
DOWNLOAD HERE
Posted by: lohrwiltionew.blogspot.com

